Monday, April 25, 2011
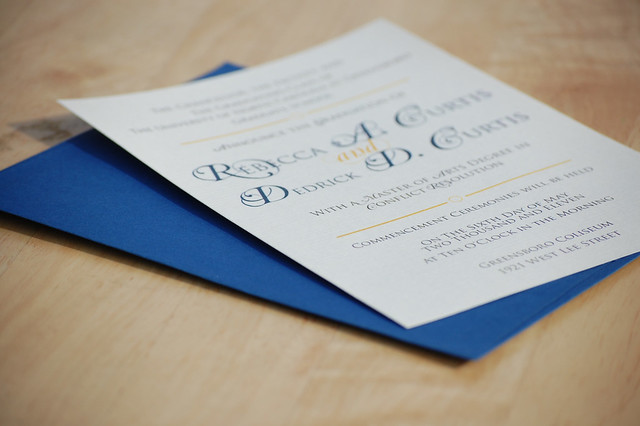
A Couple's Graduation Invitation
Rebecca and Dedrick are not only married but are both graduating next week with a Masters in Conflict Resolution. When Rebecca asked me to create one invitation for the both of them I was thrilled. What a cool idea to create a couples graduation invitation.
Friday, April 15, 2011
In the works
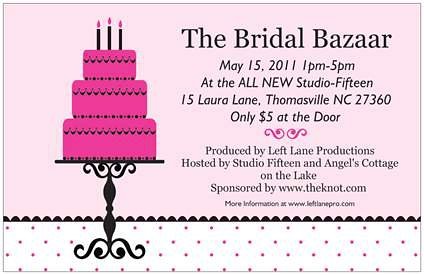
So I have again been a neglectful blogger for the last week. I have been busy busy with work, being a mom, and trying to get new pictures for my website. Also I have been prepping for a bridal show that will take place May 15th. YAY! This is my first ever. Check out the info below, if you live in area come check it out.

Thursday, April 7, 2011
Go Ahead Wine Away...
Have you ever had one of those days or better yet weeks where you are such a Debbie Downer? You know those days...those days were everything you touch turns to MUD {one of my moms quotes} and you want to tell the world how horrible life is at the current moment. 
You guys want to Wine Away too? You can get this print at my ETSY Shop. Here is the Link: Wine Away Print
You guys want to Wine Away too? You can get this print at my ETSY Shop. Here is the Link: Wine Away Print
Wednesday, April 6, 2011
So long....
So long my dear Nikon camera lens. It was a sad day on Monday when my Nikon camera lens decided to break. I guess I was a bit rough with it and letting my 3 year old niece tote it around on occasion did not help. It had handled enough abuse. With that I am sorry for the neglect to my blog. Without my camera there are no pictures and without pictures there are no good post {for us visual types at least}. Thankfully this ordeal allowed for me to order a new lens-Yay! One with better zoom. Hopefully it arrives by next week. So I leave you today with a throwback. This tutorial was one I created back in 2008 and many people have enjoyed making it. So check it out! Hopefully by next week I will have some new tutorials brewing.

A Spin off your Typical Corkboard
Making a Cork board is a very practical way to reuse/recycle old wine corks and create a unique and usable piece of art.  There have been many tutorials to make a"Wine Cork Board" so I decided to give it a try but with a little twist. I first got the idea from Martha Stewart ; she had a great tutorial for making Cork hot pads with a metal pipe clamp. My first intentions were to make these since I became very frustrated with making a typical cork board, the measurements and the glue (ahhh), but then I got an idea...the circles are very sturdy and would make a unique look if I packed them together to create the cork board.
  What I used: *Lots and Lots of Corks...while I LOVE wine, I promise I did not consume the amount of corks present in the project. I had the help of a local bar, they kept the corks for me until they had a huge bucket filled up with them.
There have been many tutorials to make a"Wine Cork Board" so I decided to give it a try but with a little twist. I first got the idea from Martha Stewart ; she had a great tutorial for making Cork hot pads with a metal pipe clamp. My first intentions were to make these since I became very frustrated with making a typical cork board, the measurements and the glue (ahhh), but then I got an idea...the circles are very sturdy and would make a unique look if I packed them together to create the cork board. What I used: *Lots and Lots of Corks...while I LOVE wine, I promise I did not consume the amount of corks present in the project. I had the help of a local bar, they kept the corks for me until they had a huge bucket filled up with them. * A shadow box frame; I found mine at Hobby Lobby. They have great deals on frames certain weeks, sometimes up to 1/2 off. Carefully remove the glass from the frame. Some shadow boxes come with frames mounted in them, you can still use these but have to break the glass to remove it.
* Several sized metal pipe hangers (found in the plumbing section of the hardware store).
* Gorilla Glue; I tried several glues during my first attempt at a typical cork board. First good craft glue (the corks would not stay)..frustrated,,,then I tried hot glue without any luck...even more frustrated. So that is when I gave up on making a cork board and decided to make the hot pads instead. When I realized how using the pipe hangers created a solid piece of cork I began again on my cork board making. I avoided the two glues I used before and invested into Gorilla glue. it was my last try and so far so good. Step 1: The first thing I did was create the circles with the metal pipe hangers just like mentioned in Martha's Tutorial .
Step 2:I placed the circles in the shadow frame in the location I liked and then glued them down with the gorilla glue. Let them dry.
Step 3:Once the circles have dried into place you can being filling in the gaps with corks. You are not going to be able to fill every inch of the frame but this only gives it more character. So if you are perfectionist you might not want to try this craft. The little holes might just drive you nuts.
This process can take some time but the end result will be well worth it.
The funny thing about my board is that there are very few real corks. Most wine I drink has some type of rubber/plastic cork but they work just as well. If you make this project I would love to see the end results! E-mail me your finished piece pamscollages@gmail.com. Each one is bound to end up different. {enjoy}