I am not going to tell you any miracle formula here, just simple advise for how to get started with "real" food. If you want more information on our families journey to a real food lifestyle check out our
Foodie Mama Talks interview. Her blog rocks!
 What is REAL food?
Real food is food, that the good Lord created for us to eat. Food that comes from the earth not from a laboratory created by a scientist.
Why should you care?
Processed foods are chocked full of additives and unnecessary ingredients that in-evidently are making us fat and sick. Did you know that today's generation of children may have a shorter lifespan than their parents. This is due to a growing rate of children with type 2 diabetes and high blood pressure. The American Heart Association states that Obesity among children "
is now the No. 1 health concern among parents in the United States, topping drug abuse and smoking". (1) Yikes!
We have to teach our children how to eat correctly, enjoy real foods, and take back our health. The best way to teach your children is by example, so put down that Big Mac and listen up.
Where to start.
1)
Read. Read up on blogs like
100 Days of Real Food and
Food Babe to start. Watch documentaries such as Food, Inc, Food Matters, Forks over Knifes, and Fed up. Read a books, Michael Pollen has a great one called
In Defense of Food
"Knowlege is Power" people!
Try not to get overwhelmed. There is a lot of information out there and some blogs have a tendency to make you feel less than perfect, but don't get discouraged. Take it slow and steady. No one can make a switch over night. It took us nearly 3 years and we still aren't perfect.
2)
Read ingredient labels. Ignore the fat/calorie content and go straight to the ingredients. Understand what is in your food and aim for an ingredient list that is around 5-8 ingredients, that's it. Also, make sure you know what each ingredient is. This habit will help you make better choices.
Here is a good example. Below are two packages of pita bread from Whole Foods.
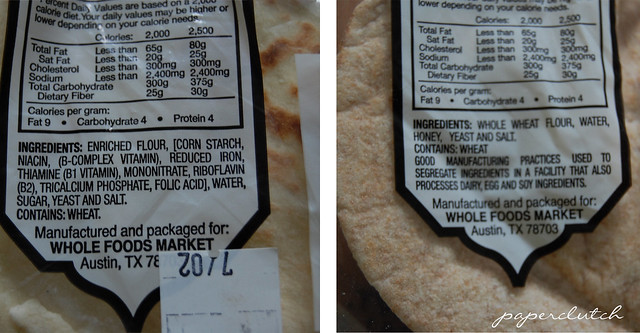
The one on the right is their wheat version, it has only 6 ingredients, all of which are real food (whole wheat flour, water, honey, yeast, and salt). The white version on the left has many more ingredients, some of which I cannot pronounce. Keep in mind that just because it says "organic" or comes from Whole Foods does not mean it is good for you, and considered real. There is plenty of organic junk food out there. Read your labels!
3)
Say no to reduced, low, or no fat. Open your pantry and fridge and throw out any foods that are labeled fat free, reduced fat, or low-fat. Even that pretty little yogurt cup you planned to eat for lunch, I mean it!
What is the big deal? Well once the fat is taken out something has to be added to improve the flavor. So the food industry adds sugar. Sometimes real sugar, other times the dreaded sugar substitutes. Ingesting a large amount of sugar can lead to cardiovascular disease and diabetes. (
2). Many people do not realize there is added sugar in almost all processed foods. It is one thing to eat 4 donuts in one sitting, but when you are unknowingly eating sugar for every meal your risks increase.
The bottom line is that if you want to eat something
eat the real thing full fat yogurt and butter included.
4)
Buy local or organic meat, eggs, and milk. It may cost more but it is worth avoiding added antibiotics and hormones. There are ways to cut the cost, simply reduce the amount of meat your family consumes. For example, our family observes Meatless Monday and we have left over night on Thursday nights so nothing is wasted.
To find a local farmer near you, search websites like:
Eat Wild or do a Google search of local farms. Check out your local farmers market and talk to the people who sell meat, they may even let you visit their farm and hang with the animals. It is easier than you think once you do your research. For those who live in the Thomasville - Lexington, NC area we get our meat from
Crossings Farm

5)
Start making food swaps. Look at the foods your family eats the most, and start making a swap either by making it yourself of finding a better option. If florescent mac & cheese in the blue box is a staple in your pantry, try an organic brand without the artificial flavors and colors. Or better yet, make it yourself. Making mac and cheese takes maybe 10 minutes longer than using the box.
Hopefully these tips will get you started on a path a real food lifestyle. Remember, take it slow and don't strive for perfection but rather progress. You can do it!
1) http://www.heart.org/HEARTORG/GettingHealthy/Overweight-in-Children_UCM_304054_Article.jsp
2) Stanhope, K. L., Schwarz, J. M., & Havel, P. J. (January 01, 2013). Adverse metabolic effects of dietary fructose: results from the recent epidemiological, clinical, and mechanistic studies. Current Opinion in Lipidology, 24, 3, 198-206.


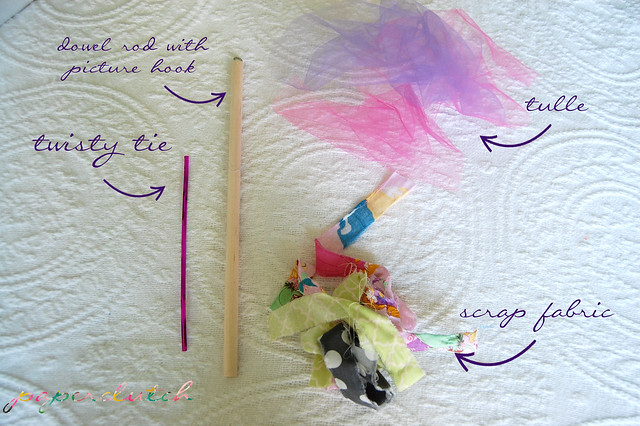 First you take a picture hook and twist it into one end of the dowel rod. I found this rather hard, it took me like 15 minutes to get one in. My husband on the other hand did the remaining 11 in like 10 minutes. Awesome, so my advice is to find your husband and have him do this step if you are making more than one.

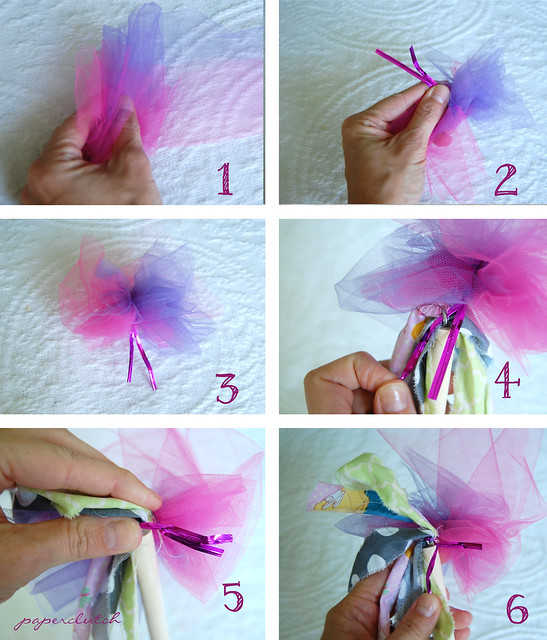
 There you have it, a shabby chic fairy wand.


