Monday, November 2, 2015

I am thankful for...

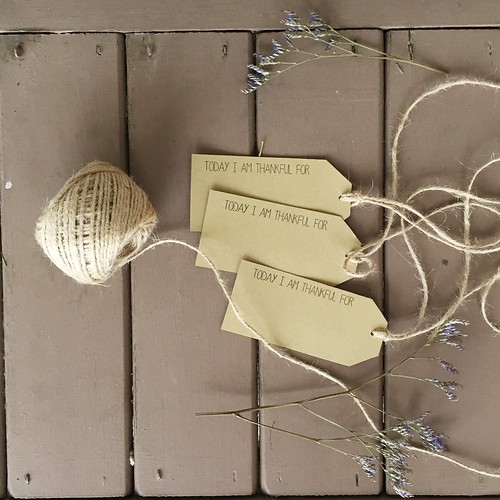
We are so blessed, but easily forget. Our family is taking on a challenge to write down one thing we are thankful for each day.
Thankfultags
If you want to do the same with your family be sure to download this free printable. The background is blank so you can print on any paper you choose. Print the tags, cut them out, punch a hole and tie some twine if you wish.  You can attach these tags to a dream catcher, tree, cork board...anything really. 
Find the printable here
Be sure to follow me @paperclutch on instagram for an upcoming giveaway.

Friday, October 23, 2015

Halloween Poster

Iputaspell
Get it while you can!

This download is free until Sunday, October 25th at 2pm. After Sunday use the code
"HOCUSPOCUS" to get $5 off the digital download in my shop.

Wednesday, October 14, 2015

Forgiveness


BeKindMockupA
Running a 5K is hard, getting up when the alarm goes off  is hard, being a mom is hard, but forgiveness; that is suppose to be easy. Over the past year forgiveness has laid heavy on my heart. I want to forgive so badly but I am {for a lack of better words} stubborn.

What I have learned is that forgiveness is not organic for me. It is something I have to choose every day when I wake up and close my eyes at night.

Day after day I will choose to "be kind, tenderhearted, and forgiving" - Ephesians 4:32 until myself and forgiveness become organic {something that fit together harmoniously}.

I created this poster as a reminder of my challenge and wanted to share it with you all.

It will be available for free download until October, 21st 2015 so get it while you can. If you miss it you can purchase the poster at my etsy shop.


Check out #21forgivingdays created by @nocookpaleo

Wednesday, January 21, 2015

DIY Maple Latte

This is by far is my FAVORITE latte! Move over fancy coffee shop, I don't need to spend $3.50 for my daily coffee fix. I can do it at home, without the refined sugar and nasty additives. It is pure deliciousness!
DIYLatte1

The ingredients & tools: 
  • A cup of your favorite coffee 
  • A small mason jar (or any jar with a lid) 
  • 1/4 Cup Organic Milk or Half & Half 
  • 2 tsp Maple Syrup 
  • 1 tsp *coconut oil (optional) *If you are just starting to consume coconut oil start with 1/2 tsp, it can cause a little stomach ache if you start out too strong.  Then you can increase your amount up to 1 tbs if you wish.

DIYLatte2
Pour 1/4 cup of milk or half & half into a jar, add the maple syrup and coconut oil (coconut oil will be solid). Pop your jar (uncovered) into the microwave for 25 - 30 seconds. If you are anti microwave warm your mixture up on the stove, just enough for your milk to steam then pour it into a jar. Take the milk mixture out of the microwave, put the lid on it and give it a good shake for at least 20 seconds.
DIYLatte3
Pour the frothy mixture into your hot coffee.
DIYLatte4
There you have it. A delicious DIY latte. 
DIYLatte5

Tuesday, July 29, 2014

Shabby Chic Fairy Wand

I have a kid who is obsessed with playing dress up. As soon as she gets home from school she is stripped down and digging in the dress-up drawer for a dress, crown, and wand. I decided to feed her obsession and create fairy wands for her and her friends at her 4th birthday party.
Shabby Chic Fairy Wand
This craft is rather inexpensive and crazy easy. I did have a lot of parent participation given this activity with with 4 year old kids.
What you need:
Dowel Rods
Picture hook (you know the round ones that come in a picture hanging kit with a screw end)
Fabric scraps or ribbon
Tulle
Twisty Tie
And the ability to tie knots
Shabby Chic Fairy Wand 
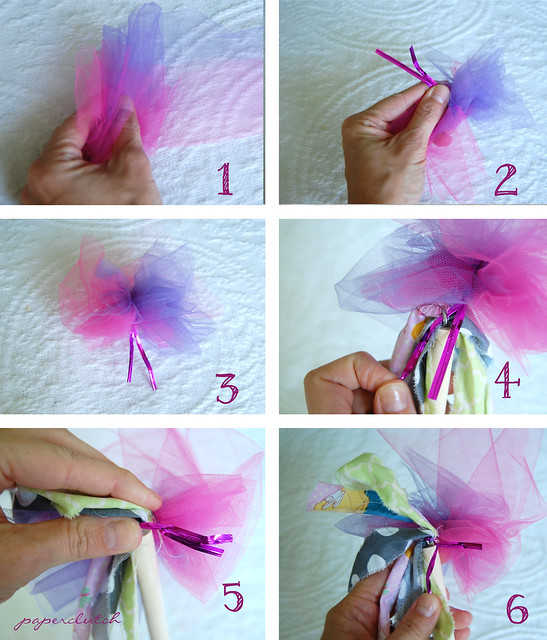
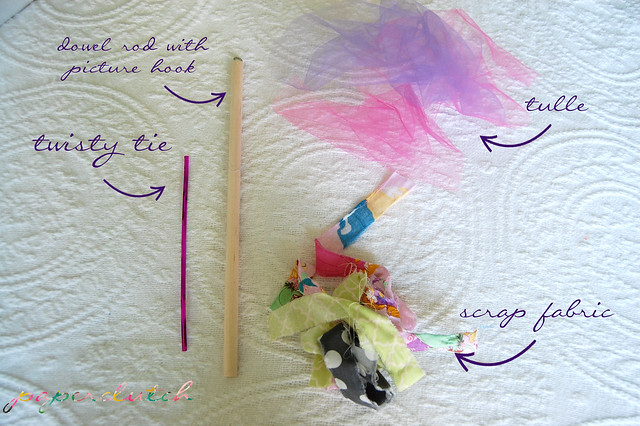
First you take a picture hook and twist it into one end of the dowel rod. I found this rather hard, it took me like 15 minutes to get one in.  My husband on the other hand did the remaining 11 in like 10 minutes. Awesome, so my advice is to find your husband and have him do this step if you are making more than one.
Shabby Chic Fairy Wand
Take about 3 strips of fabric or ribbon and feed it through the hook then tie a knot in each. The 3rd piece may not even need a knot. Next you need to make your tulle poof and attach it to the picture hook.
Shabby Chic Fairy Wand
First take your strip of tulle and fold it up accordion style.  I used 2 scrap pieces (to create a multicolored effect) and when combined measured approximately 8" wide x 2.5 ft long. Do not strive for perfection when folding, you really just want a bunched up ball of tulle. Then, take your piece of twisty wire and wrap it around the middle of your folded tulle and twist to create a poof. Take the twisty wire and feed it through the picture hook and twist to attach.
Shabby Chic Fairy Wand 
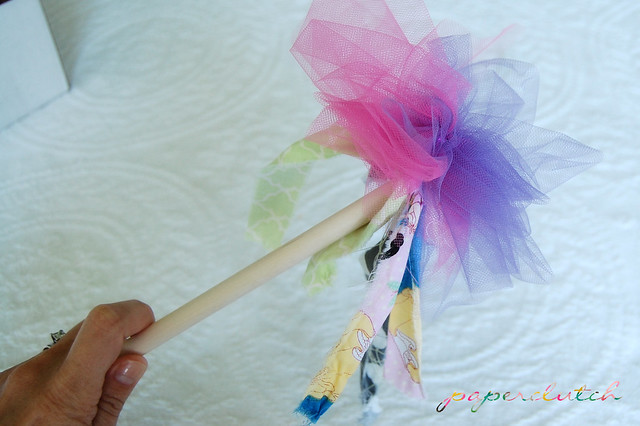
There you have it, a shabby chic fairy wand.

Thursday, July 17, 2014

Cards in a pinch

FreebiePrintable
I have been trying really hard this year to send more notes in the mail. I just love getting fun mail. It makes me feel special, that someone took the time out of their day (and spent 49 cents) to make me smile.  

Arrow Blank Card
                                                           Find the arrow card HERE.

To help you with making people feel special, I have two printable note cards to share. 

Geometric Birthday Printable
Find the geometric pattern birthday card HERE.

Print your cards on 80 lb white cardstock then cut to size (these note cards are 5.5 x 8 before folding).  Then fold your card in half. These fit perfectly in an A2 envelope. {enjoy}

Tuesday, July 15, 2014

Homemade Chocolate Syrup Goodness

My family is pretty much obsessed with chocolate syrup.  It was one of the last items we go rid of when we started eating more "real." I knew my husband and oldest would not give up chocolate milk so I decided the next best option was to make my own. 
Chocolate Syrup ; http://paperclutch.blogspot.com

Honestly, have you ever looked at the ingredient label of your chocolate syrup in fridge? If you don't have a bottle handy, this is the list of ingredients.
HIGH FRUCTOSE CORN SYRUP; CORN SYRUP; WATER; COCOA; SUGAR; CONTAINS 2% OR LESS OF: POTASSIUM SORBATE (PRESERVATIVE); SALT; MONO- AND DIGLYCERIDES; XANTHAN GUM; POLYSORBATE 60; VANILLIN, ARTIFICIAL FLAVOR
Ick! I don't understand why the food industry has to make it so complicated when it can be so simple, only 4 ingredients.  

Chocolate Milk

Ingredients:

1 1/4 cup Organic Cane Sugar 
1 cup Coco powder
1 cup + 3 tbs. Water
1 tsp. Vanilla

Directions:


1) In a medium pot, mix sugar and coco together.

2) Turn on your burner to medium heat and add the water in slowly.  Begin whisking the water into the sugar/coco mixture. Make sure you get around the edges of your pot, sometimes the sugar and coco like to hide out and cling to the side.

3) Continue whisking until the sugar and water are well combined and the chocolate begins a low boil. Whatever you do, don't step away from your pot or you will have burnt chocolate, trust me on this one. 

4) Let the mixture boil for 1 minute. 

5) Remove from the burner and let cool for several minutes.

6) Add the vanilla and stir.

7) Transfer to a pretty little dish and serve or store.

Tada you have yourself the most delish chocolate syrup around. This keeps for a few weeks in the fridge. As long as little fingers are not involved.

Chocolate Syrup http://paperclutch.blogspot.com